Locking it down

At the company I currently work for, there are only a handful of users that are allowed to work remotely. They have been issued laptops but they are locked down. When I say locked down, I mean the user’s can’t even right click on the screen. The network admin insisted that the users only be allowed to connect to the VPN, a remote desktop session to their desktop, and display settings for dual monitors, and that’s it. This may seem a little paranoid, but given that it’s a financial institution, it’s understandable. Recently, I had to go back through and set up a few laptops. There wasn’t any previous documentation for this, and I didn’t exactly have a baseline- so I was working from scratch.

It is good to note that these instructions are specific to Windows 10, as it mentions the removal of Cortana and other default settings from Windows 10; however, can easily be modified for Windows 7.
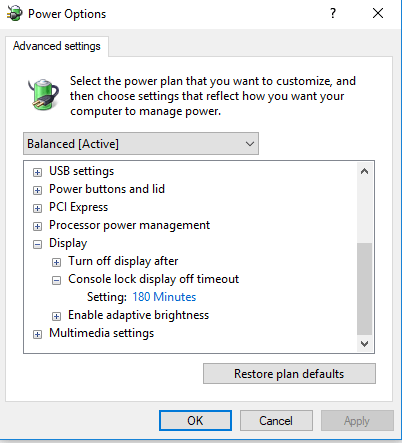
First, it is a good idea to make a backup of the registry and make a restore point before starting. It is important to make any changes you want to the user account before locking down. For example change background picture or power settings etc. Although most of these changes can be done through group policy it may be easier adjusting these settings while logged in as the user to be locked down.
Locking down the majority of the user environment will be done from the Group Policy editor when logged in as the administrator.
Open the Group Policy editor by typing mmc in the search bar or in the run box and pressing enter. Click “File” from the menu and select “Add/Remove Snap in…”. Once the dialog box opens choose Group Policy Object from the Left pane and then click “Add” in the center. Click the browse button in the next dialog box and choose the users tab. Now click on the user or group you want affect. In this case we are choosing the mobileuser profile. Click “Finish” and then OK. From here any changes you make to this policy object will only affect Non administrators (or only the user or group you’ve chosen”.
If the interface is locked down, users will not have access to any drives however they can still access their desktop. To disable saving items to their desktop open the security properties of the user’s desktop and administrator ownership. Disable modification by the user and now they cannot save, modify or create anything to the desktop.
Prior to beginning the lock down, there are a few changes that must first be made directly to the mobile user account, while they are logged in. First, temporarily make the user an administrator.
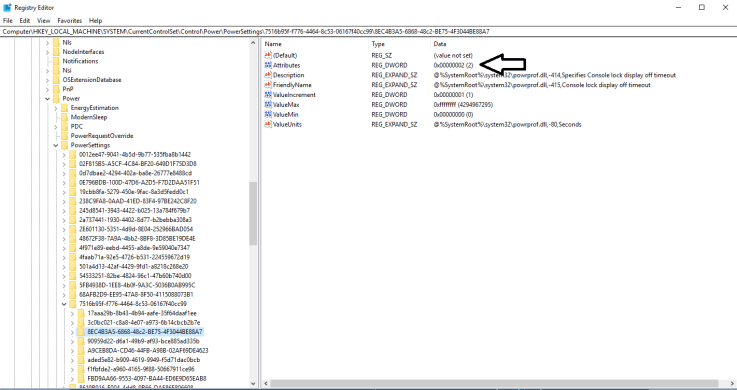
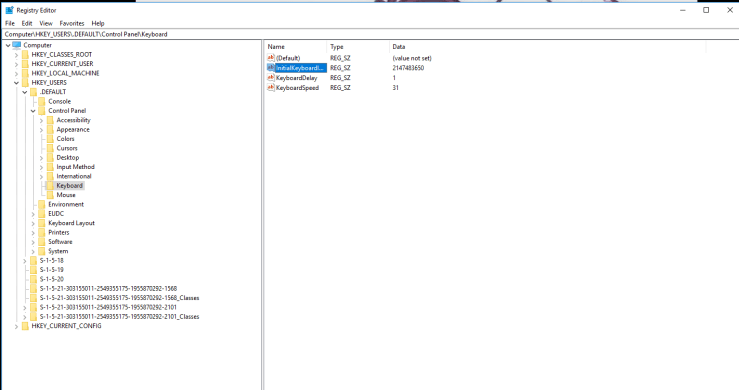
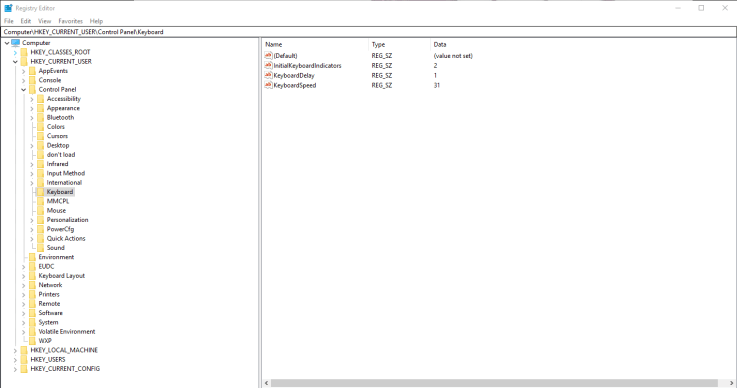
Next, login as the mobile user- and proceed to the registry
Drill to here:
HKEY_CURRENT_USER\SOFTWARE\Microsoft\ Windows\CurrentVersion\Policies

  • Right click on policy and click new – key- name it explorer (if it is not already available)
  • Once this is done, right click on the newly named key and click new, DWORD
  • It will ask for a name, insert NoStartMenuMorePrograms and change the value to 1. This will completely remove startup programs- however, the apps will be removed in another way through GPO.

The next thing we need to do is add shortcuts to the desktop for the display, VPN, and remote desktop connection to the user’s computer. For a full list of ms-settings commands, check out this article.

For the display shortcut

  • Right click on the desktop and select new shortcut
  • Insert ms-settings:display – click through next

For the VPN connection

  • Right click on the desktop and select new shortcut
  • Insert ms-settings: ms-settings:network-vpn
  • Open the VPN shortcut, add new connection. Connect to whatever your VPN is

For RDP:

  • Set-up the rdp profile – username (username)
  • Under display settings, choose use all monitors
  • Under local resources, turn off sound
  • Test the connection and make sure it is a shortcut on the desktop

Other things to do prior to lockdown through GPO

  • Remove Cortana

Right click taskbar, select Cortana, hide

  • Go into the start menu, and get rid of all the bloatware, right click and uninstall what you can, and hide the rest
  • Go into programs and uninstall everything that isn’t necessary- including office. The only things we want users doing is accessing the VPN and remote desktop.

Switch back to the admin account. Make your mobile user a standard one again. Proceed to the mmc snap-in and create a new console. Name it mobile user. Now we can proceed with the lockdown.

Part 1:
Select console, then go to file and hit new. Right click console and choose add/remove snapin. From the menu, select Group Policy Object, click add. In the following window, select the users tab and navigate to the desired user, in this case, mobile user. Follow through the prompts.
Next, our window will open with various GPO’s, and we can begin locking it down. We are going to start with the desktop.
1.) Select the administrative templates folder

  • Desktop and then enable these policies

Remove computer icon on the desktop
Remove recycle bin from desktop
Next, we will lock down the start menu and taskbar settings. There are several items within this menu, some are disabled, and others enabled.
1.) From the administrative templates folder, navigate to Start Menu and Taskbar, and DISABLE the following features

  • Add sear internet link to start menu
  • Show quick launch on taskbar
  • Show the app view automatically when user goes to start
  • Add the run command to start menu
  • Show windows store apps on taskbar

From the same location, ENABLE the following objects:

  • Disable context menus from start menu
  • Turn off personalized menus
  • Lock the taskbar
  • Remove balloon tips on start menu
  • Prevent users from customizing start screen
  • Remove common programs from start menu
  • Remove favorites menu from start menu
  • Remove search link from start menu
  • Remove frequent programs list from start menu
  • Remove game links from start menu
  • Remove help menu from start menu
  • Remove all programs list from start menu
  • Remove pinned programs list from start menu
  • Remove recent items from start menu
  • Do not use search based method when resolving shell
  • Do nut use tracking based method when resolving shell
  • Remove run menu from start menu
  • Remove default programs link from start menu
  • Remove documents icon from start menu
  • Remove music from start menu
  • Do not search communications
  • Remove search computer link
  • Remove see more results / search everywhere link
  • Do not search for files
  • Do not search the internet
  • Do not search programs and control panel items
  • Remove programs on settings menu
  • Prevent changes to taskbar and start menu settings
  • Remove download links from start menu
  • Remove homegroup link from start menu
  • Remove recorded tv link from start menu
  • Remove user’s folders from start menu
  • Remove videos links from start menu
  • Do not display any custom toolbars in the taskbar
  • Remove access from the context menus for the taskbar
  • Prevent users from uninstalling applications from start
  • Remove links and access to windows update
  • Do not allowing pinning store app to taskbar
  • Do not allow pinning to jump lists
  • Lock all taskbar settings
  • Prevent users from adding or removing toolbars
  • Prevent users from rearranging toolbars
  • Do not allow taskbars on more than one display
  • Prevent users from moving taskbars from one screen to another
  • Prevent users from resizing taskbars

3.) Next, select the windows components folder, then go to file explorer, and enable the following rules:

  • Remove file explorer’s default context menu
  • Turn off Windows hotkeys

4.) Next, select administrative templates, then control panel and enable the following:

  • Show only specified control panel items – click show, and enter these:

Microsoft.NetworkAndSharingCenter
Microsoft.Display

And that should do it. Crazy right? If you want someone locked down to the absolute max, this will be for you. Hope you enjoyed and found this interesting!

Windows resizing and moving on dual monitors

I had two users come to me with an interesting issue. Every time they would go to lunch, or leave their desks for a period of time- they would come back and their windows that were open would shift to the other screen or resize. I had others report the issue sometime later, but this one had me stumped for a bit, and the fix is… well, less than ideal but so far it has been the only thing I could find to work.

When I began researching the issue, there were suggestions of downloading programs that served as placeholders for icons and windows. Naturally, in this environment- I am not going to do that simply because I do not place trust in such a program/executable. I am a firm believer in that there is almost always a way to fix things on your own, sometimes you just have to dig deep.

First thing I looked at was sleep settings. Both of these users were set to never sleep. I double checked the power plans on both. The more I read about the issue, the more people were pointing to display/graphics drivers. The machines themselves are HP G2 260 minis, with HP P223 monitors. One using VGA the other HDMI. I had a hard time believing this was a driver issue, but figured what the hell. May as well rule it out. I proceeded to uninstall and reinstall the drivers for monitors and the video card for the PC. Neither made a difference in the issue. I had also attempted swapping cords, just in case, and of course that was not the issue either.

So, I start leaning back towards power and sleep settings again, figuring there HAS to be SOMETHING I am missing. After several coffees, and digging into multiple articles, I read about a power setting, “console lock display off timeout.” But, the crazy thing was, it was not listed as an option from within my control panel. It was supposed to be nested under display settings.

power

So, I had to figure out how to get this setting. I started digging for that answer, I figured it had to be a registry or command, something. I found my answer in the registry settings. To get the option of console lock display timeout, it must first be enabled in the registry.

As always, back up your registry first in case you make a mistake.

Computer\HKEY_LOCAL_MACHINE\SYSTEM\CurrentControlSet\Control\Power\PowerSettings\7516b95f-f776-4464-8c53-06167f40cc99\8EC4B3A5-6868-48c2-BE75-4F3044BE88A7

Once there, change the attributes value to 2.

reg pow

Now, the setting will appear in the power options within the control panel.

contrl

As you can see here, I changed it to 180 minutes. Perhaps a little bit over kill. So what this setting does is prevent the display from sleeping on the lock screen. Once I changed this for the two users, they did not experience further issues. This was a few months ago, and frankly I haven’t revisited the issue, since this worked. Since then I have had others report the same issue, so I built a package in PDQ deploy to automate the process. The first step is a powershell to enable the registry setting, and the second step is a command line to change the console lock setting in the power configurations.

Powershell to change the registry key:

Set-ItemProperty -Path HKLM:\SYSTEM\CurrentControlSet\Control\Power\PowerSettings\7516b95f-f776-4464-8c53-06167f40cc99\8EC4B3A5-6868-48c2-BE75-4F3044BE88A7 -Name Attributes -Value 2

Command line to change the power settings: 

powercfg.exe /setacvalueindex SCHEME_CURRENT SUB_VIDEO VIDEOCONLOCK 10800

This made for easy deployment. I hope you found this useful!


Number pad not working on logon

Imagine my frustration trying to quickly type my password (which includes a variety of numbers) just to find out the numlock was not turned on! It was happening every time I logged on in the morning, and shutting again when swapping between regular and admin accounts.

So what’s the big deal? It’s just an extra keystroke. It’s a convenience thing really, but there were a few other users griping about it as well. Hey, anything I can do to make their job easier and mine- I am all for. Keep tech working, and people are kept happy- amiright?

I began researching the issue, and naturally people pointed to the BIOS. This is a windows 10 environment, so it is UEFI now.  You can get into it one of two ways. The first being holding down the shift key while rebooting, or you can go in through settings> update and security> recovery> advanced startup> restart now. Once the system reboots, select Troubleshoot> advanced options> UEFI firmware settings> and the PC will boot into BIOS. You can check out this link for pictures if you like.

**IMPORTANT!!**

Take great care when making any changes here, as you can do some serious damage to your computer.

Once you have entered the BIOS, you will see this screen:

20190227_140604

Select F10 here, or whatever the key is on your system.

next, this will appear. Using your arrow keys, navigate to advanced, and then select device options. As you can see here, the num lock state at power on was already enabled. If for some reason it is not enabled for you, enable it, and hit F10 for accept.

20190227_140659

Next, we need to exit. Go back to the file menu. You have options here to save changes and exit, ignore and exit, or reset to default. Because I did not make any changes, I am choosing to ignore and exit.

20190227_140721

As it turns out, this was not my issue. Where does that leave me? Where else but the registry. Something I was terrified to make changes in for awhile, tbh. But now, I figure to heck with it. Back it up and forge ahead. We’re going to find our answer one way or another!

You can edit the keyboard setting for the current user, but why do that when you can do it for all users and be done with it? Open up a run dialog and punch in regedit. Navigate to HKEY_USERS\.DEFAULT\Control Panel\Keyboard. the key we need to change is InitialKeyboardIndicators. the value you see here will likely be 2147483648. It needs to be changed to 2147483650.

regedddd

Once this is set, you should be good. Now, if you are just changing the current user only for some reason, navigate to Computer\HKEY_CURRENT_USER\Control Panel\Keyboard. The same InitialKeyboardIndicators will be found here, but this time the value is 2.

reg2

And there you have it! Note the registry can only be edited in Administrative mode. Pat yourself on the back, you’ve made yourself (and possible other users) happy campers! Have a coffee and march on!

Why empathy matters in I.T.

Before I became an I.T. support specialist, I spent 12 plus years working in service industry roles. I held various positions from waitress to retail management. During those years, I learned how to help people, not just help them find things, or take their orders- but genuinely help through offering suggestions for projects, or going ‘the extra mile’ by ensuring they had what they needed, even if that meant traveling to obtain items or battling prescription insurance companies, or loading 80lb bags of cement into a pickup truck. I’ll be the first to admit my customer service game isn’t always on point, sometimes I have tough days too. But customer service is more than that. It’s listening, showing empathy, and talking to people like they’re humans.

I recently was hired to a University. I’ll be starting there in two weeks. It’s my dream job and I’m beyond excited. When I broke the news to my current employer, a lot of the staff were bummed out. I received this email earlier today from a woman I’ve helped out a few times with various tickets:

Crystal,

I missed you when you came through on yesterday. I was so sadden to hear you are leaving us! You have been such a great access for me. Never have you made me feel inadequate or stupid! Always helpful, patient and just a wonderful person to work with. I know your new opportunity is an exceptional one and you would be foolish not to accept the chance to work at the University. It is my prayer that the Good Lord will bless you! Hopefully, every once in a while you will come by and visit me/us.

Great Success!!!

I had others day similar to me, and while it warmed my heart, it made me sad to think that anyone would make her feel stupid because she doesn’t know how to do something. No one should ever feel that way. Just because technology comes easy for me, doesn’t mean it will for a teller. Everyone has things they’re good at, and not everyone is going to know what you think they should know, nor should they be expected to.

In this field, it is imperative to be patient, kind, and understanding. They call us for help, and that’s what we are here for. Talk to people, explain what you are doing and how you are working to come up with a solution to the problem. Ask them how their day is going. Ask probing questions without automatically assuming things. Be polite. Instead of asking, “well what were you doing?” Try “can you show me what was happening and maybe I can figure it out from there?”

Being friendly and approachable makes a big difference, people trust you more and are more receptive to what you have to say. Additionally, it creates a better environment all the way around. I know I like my job a lot better when people feel like they can talk to me.

I think it’s important to treat people with kindness in general. I hope if you’re reading this you’ll slow down to think about some of your interactions and try to meet people with empathy in mind. Especially if you’re in the service industry, I think you’ll find your job will get a heck of a lot better.

.NET 3.5 won’t install

Interesting instance came up at work a few months ago, and then again today, and boy am I glad I wrote down the fix. I remember the last time this happened, I could not find the exact error code fix online for some time. It threw an error code something to the affect of 0x8000 (of course I can’t find my screenshot!) There are several versions of that error code, and quite a few (with their fixes) are listed on a Microsoft article here.

Typically speaking, you would just be able to activate .NET 3.5 through control panel> programs> programs and features > turn windows features on or off. Simply check the box next to .NET and  have it search automatically online for the updates. However this was where I ran into the issue, it would not auto install as it should. After thorough digging, it was found that WSUS was interfering with this. Here is the fix for that, open up a run command and go to regedit. Navigate to HKEY_LOCAL_MACHINE\SOFTWARE\Policies\Microsoft\Windows\WindowsUpdate\AU change the registry key “UseWUServer” to 0. This will temporarily bypass WSUS. You will need to have administrative privileges for this to work. 

Exit the Registry and restart the Windows Update Service in task manager, or reboot. Go back into the control panel and install the 3.5 .NET framework. Once it has been installed, go back to the same registry key and change the value back to one, and once again, restart the Windows update services within task manager. And voila! Success! Pat yourself on the back and grab a coffee! 🙂 

Password storage on premises

One of the things I was tasked with when I began this position was to find a solution for on premise password management. Why on prem when you can do a slick cloud based like Last Pass, you ask? Well… It’s a financial institution. Auditors and compliance officers do not agree with cloud based solutions. There are few exceptions with some software we use, but they are far and few between. What made this even more of a challenge was the company didn’t really want to shell out a significant expense for a paid version of something. So where did that land me? KeePass.

KeePass is free, fairly secure, and the configurations allow for enforceable rules through editing XML document. Login can be multifactor or single password. You can have Windows authentication, a token (via available plugins), certificate based login, master password, or a combination of these. Because we have users that switch desks at times, we went for the option of using a master password. The certificate based and Windows authentication are limited to the device itself. Though the database file can carry over with the user’s profile.

Here is the proposal I wrote for the company, highlighting some of the features of the product and includes links to additional information regarding the security of the product:
Password management and safety plays a key role in cyber security and safety. Employing the use of software that allows staff to securely store their information is of interest. We have been testing a product called Keepass, and believe that this may be a viable solution for the company. KeePass offers 256 bit AES encryption with enforced access by a master password to the vault, along with other potential multi-factor authentications including the use of domain user account and/or certificate based authentication. KeePass can be customized which is beneficial. Furthermore it is an on premise solution, putting the control in our hands, rather than relying on cloud based storage- as many password management sites are geared towards. Here is a small sampling of the features that have been enforced:

Master password min. Requirement is 16 characters
Master password must also be at least 20 bits in quality
Master password is set to expire every 90 days
Clipboard clears after 30 seconds
Limit to single instance of being open
Workstation (KeePass window) auto locks after 15 minutes
Auto-type to websites has been disabled
Invalid certificates are not accepted
Database auto saves upon any changes being made
Expired entries will prompt warning

The way these rules are enforced are through an XML enforced configuration file that affects each user upon the creation of their databases. Some options have been left open for the user to customize the basic look and feel of their windows and menus; however, any options relating to security or policy have been locked. Access to the enforced configuration file is strictly limited to the IT administrators, and KeePass will be accessed through a secure drive, with limited read/execute privileges to the users, while the enforced configurations remain hidden.

KeePass vulnerabilities are continually addressed, and the company makes that clear on the security page within their site. Vulnerabilities and actions taken may be viewed on their site here. The developers of KeePass remain active on SourceForge and have extensive documentation and help topics available. They continue to update the product, with the most recent being 01/09/19. More information can be found here.

KeePass underwent a thorough security audit by the European Commission’s Free and Open Source Software Auditing, and while there were minor problems within the code, no real security threats were found. I have attached a copy of the full PDF report for your viewing. keepass audit

KeePass has also received awards from German federal office for information security, along with awards from the French network and information security agency. The program also comes recommended from a number of online forums and websites such as PCMag, How to answer, and Krebs. You may view several of these articles and recommendations here.

We are investigating additional ways to secure the program. There are a few nuances such as the utilization of Windows Authentication. By adding this, it provides an additional layer of security through authenticating that it is the user logged on prior to opening the database; however, if the user (or even another user) attempts to open the file from another location, it will reject the composite key as invalid. Through probing, it was also discovered that modifying permissions to the user’s database file does not allow access. While KeePass can be cracked, it would take a rather large effort on the attacker’s part- including resolving the hash and employing a key logger. However, we have enforced the master key being entered on secure desktop in order to thwart keylogging. Information on breaching KeePass can be found here.

Overall, this program offers fairly robust security and should be considered an option for password management storage.

In order to create the enforced configurations, I went through a lot of trial and error adjusting settings within the program, and then copying them over to the enforced config file. This can be done in notepad++. The way I chose to do the deployment was to copy the program to the C drive for local users and modify permissions to the xml enforced config file. With that deployment, I also copied a how to file with screenshots to each user’s desktop as well. I am happy to say that it is a fairly intuitive program and most users adapted quickly. I would post that documentation here; but it has sensitive information in some of the screen captures.

Overall it has been a positive experience with this program, and it could be a potential solution for you as well. Hope you enjoyed this and were able to gain new knowledge. Have a great day! 🙂

What the heck happened to my icons?! *Updated*

This one is a riot and frankly had me stumped longer than I care to admit. I had a user call in saying their desktop icons had all turned white/blank.

It started with one user, then another, and then that number grew to six. The common denominator was that each of these users had been recently upgraded from Windows 7 pro to 10 pro. Which, BTW you can still do for FREE. (Disclaimer on that, I don’t know how long that upgrade link will be good for. Microsoft had announced it would be ending, but it clearly hasn’t. Also, make sure you update your chipset and video drivers afterwards. Dual monitors don’t like to work with the Windows 7 drivers. Dell just had a bunch of updates between December and February 2019)

I digress. Anyway, these people had all been updated at different points in the past few weeks, but the icon issue happened to them all in a 48 hour time frame. Also, it was affecting any user that logged onto the affected machine. Gotta be an update right? We attempted rolling back a cumulative update on Feb 11th for 1809, this did not work. Here are some of the other things I attempted that did not work; however, in different instances they make work for you:

  • Clear the icon cache. First- in file explorer, make sure you change the view to show hidden folders.
  • C:/users/%user%/appdata/local/ and find the IconCache.db. Permanently delete. Go into task manager (right click toolbar and select task manager) in processes towards the bottom, select file explorer- right click and restart the process.
  • If that doesn’t work you can attempt this: windows + r key and type ie4uinit.exe -show
  • You can try system file checker but that didn’t work for me either.

So where does that leave me thinking? Registry. It’s always the registry. After doing some Google Kung Fu, I found the culprit. I found another article that said Palo Alto Traps caused the change in the key, but I don’t buy it. If that had been the case, all of my users would have been affected. Anyway, here’s what you’ll need to do.

  • Open up run command, Windows key + R
  • Type in regedit
  • BACK UP YOUR REGISTRY FIRST!
  • Navigate to: HKEY_CLASSES_ROOT\lnkfile/shellex\IconHandler change the default to 00021401-0000-0000-C000-000000000046

Now, the original article I found this beautiful nugget of information in, recommended deleting and rebuilding the icon cache after this change, but it works fine without it. You will need to restart the file explorer process again afterwards, or reboot. Your choice. For mass deployment, we created a packaged in PDQ deploy (that’s what we use. I love it). Once I’m back at work Tuesday, I’ll grab the details of the package and post them here.

This was a maddening event, like I said it took me longer than I care to admit to figure out, but I did find the answer and I was pretty excited about it. Thanks for reading!

*Edit*

For mass deployment, export the registry file for that key. Our environment uses pdq deploy and here is the package details.

Step 1 install file, here insert the path to the exported registry file

Run the following command to merge the registry

Merge registry. Command line regedit.exe /s “name of exported reg file”

Next powershell to restart the file explorer for the change to take affect
Stop-Process -ProcessName explorer -Force

Welcome!

I’ve decided to create a blog about my work in tech support. In I.T. there is not a day that goes by without a new challenge or learning something new. I thought it would be good to start recording some of that knowledge and tricks I picked up. This will be primarily for educational purposes and I hope it can help others in tech as well. I’ll be posting stories here about tickets created and solutions I’ve found. I’ll also be posting some procedures I’ve developed for certain process.

Being that my posts will be involving tech support related items and offering solutions I have found, I have to make a disclaimer- if you attempt any of my solutions, I will not be held responsible for anything that goes wrong. Any good tech knows to make a backup first before proceeding with troubleshooting.

Anyway, I hope to make this fun for you, and hopefully help at some point as well. Thanks for visiting!!

-Crystal